Raspberry PI + OpenVPN: Connect your home network to AWS VPC Private subnet
Context
You have EC2 instances running in AWS VPC Private subnets, isolated from the outside (internet), only reachable from the internal subnets of the VPC.
Problem
How to reach out (ping, ssh, scp, curl, etc) your private EC2 instances running in your AWS VPC Private subnets from your home network in a secure way?
Forces
- The EC2 instances (don’t have Elastic IP Address) are located in private subnets, i.e., they are associated to a Route Table that doesn’t have an Internet Gateway.
- The EC2 instances just have one or more private IP address that belongs to private subnets.
- You don’t want use a public EC2 as a middle step to connect to a private EC2 once inside.
- You don’t want to install anything in your computer, just connect your computer to your home network and be able to talk with your AWS Private subnets.
- You don’t need a high throughput link between your home and your AWS VPC.
Solution
Setup a Raspberry Pi as your default gateway (DHCP server, enable ipv4 forwarding and masquerading to your requiered network interfaces) and create a link to your remote AWS VPC subnets with OpenVPN.
Example
This example requieres two devices running OpenVPN (client and server) to create the link, an EC2 instance running in a public zone of your AWS VPC with an Elastic IP Address and the Raspberry Pi (in your home network).

OpenVPN Server (EC2 in a public subnet)
Create an EC2 instance running in a public subnet with an Elastic IP address (In my case, I’m using a NAT Instance to provide internet to the EC2 instances running in the private subnets, this is not required, but I re-used the same instance to configure the OpenVPN server).
That EC2, should have access to the private subnets, to ensure and verify the security groups and the VPC Network ACL associated to your VPC and subnets.
Follow the how to article from OpenVPN to install and setup OpenVPN, you can decide to secure your VPN with a static key or with a PKI (Public Key Infrastructure), in addition to the security advantages that PKI offers, you also can configure OpenVPN server to associate private subnets based in a Common Name, and, with that, push these subnets to all the OpenVPN clients.
The following file is an example of the OpenVPN config file:
port 1194 # OpenVPN listen port
proto udp

dev tun # "dev tun" will create a routed IP tunnel

# SSL/TLS root certificate (ca), certificate (cert), and private key (key).
# The server and all clients will use the same ca file.
ca ca.crt
cert NAFIUX-AWSUSEAST-NCPDEV-GATEWAY.crt
key NAFIUX-AWSUSEAST-NCPDEV-GATEWAY.key

# Diffie hellman parameters.
dh dh.pem

# VPN subnet for OpenVPN to draw client addresses from, the server will take 172.16.0.1 for itself,
# the rest will be made available to clients. Each client will be able to reach the server on 172.16.0.1.
server 172.16.0.0 255.255.254.0

# Maintain a record of client <-> virtual IP address
ifconfig-pool-persist ipp.txt

# Push routes to the client to allow it to reach other private subnets behind
# the server.  Remember that these private subnets will also need to know to route the OpenVPN client
# address pool (172.16.0.0/255.255.254.0) back to the OpenVPN server.
push "route 172.16.2.0 255.255.254.0"

# The keepalive directive causes ping-like messages to be sent back and forth over
# the link so that each side knows when the other side has gone down.
# Ping every 10 seconds, assume that remote peer is down if no ping received during
# a 120 second time period.
keepalive 10 120

# Enable compression on the VPN link. If you enable it here, you must also enable it in the client config file.
comp-lzo

# The persist options will try to avoid accessing certain resources on restart
# that may no longer be accessible because of the privilege downgrade.
persist-key
persist-tun

# Output a short status file showing current connections, truncated and rewritten every minute.
status openvpn-status.log

# Set the appropriate level of log
# file verbosity.
#
# 0 is silent, except for fatal errors
# 4 is reasonable for general usage
# 5 and 6 can help to debug connection problems
# 9 is extremely verbose
verb 3

# (1) see comments below
# Client configuration directory
client-config-dir ccd
# (2) see comments below
# Add the route to the kernel
route 172.16.4.0 255.255.254.0

# (3) see comments below
# This will cause the OpenVPN server to advertise client's subets to other clients
client-to-client
# (4) see comments below
push "route 172.16.4.0 255.255.254.0"
Here are some comments about the OpenVPN Server configuration server:
1) ccd is the folder in which I have a file per each OpenVPN Client which contains the subnets associated to them, example:
# ccd/NAFIUX-MX-TIJDEPTO-RPIVPN
iroute 172.16.4.0 255.255.254.0
iroute generate an internal route to a specific client. This directive can be used to route a fixed subnet from the server to a particular client, regardless of where the client is connecting from. Remember that you must also add the route to the system routing table as well (such as by using the route directive).
2) It’s neccesary to register the route to the Kernel IP routing table. The reason why two routes are needed is that the route directive routes the packet from the kernel to OpenVPN. Once in OpenVPN, the iroute directive routes to the specific client.
3) client-to-client: Because the OpenVPN server mode handles multiple clients through a single tun or tap interface, it is effectively a router. The client-to-client directive tells OpenVPN to internally route client-to-client traffic rather than pushing all client-originating traffic to the TUN/TAP interface.
4) You must push the route to the OpenVPN Clients to give them visibility about the routes of other clients connected to OpenVPN Server.
OpenVPN Server removes the push route command to the OpenVPN Client which contains that route, here is an example of the log file in the server side:
x.x.x.x:49881 [NAFIUX-MX-TIJDEPTO-RPIVPN] Peer Connection Initiated with [AF_INET]x.x.x.x:49881
NAFIUX-MX-TIJDEPTO-RPIVPN/x.x.x.x:49881 OPTIONS IMPORT: reading client specific options from: ccd/NAFIUX-MX-TIJDEPTO-RPIVPN
NAFIUX-MX-TIJDEPTO-RPIVPN/x.x.x.x:49881 MULTI_sva: pool returned IPv4=172.16.0.6, IPv6=(Not enabled)
NAFIUX-MX-TIJDEPTO-RPIVPN/x.x.x.x:49881 MULTI: Learn: 172.16.0.6 -> NAFIUX-MX-TIJDEPTO-RPIVPN/x.x.x.x:49881
NAFIUX-MX-TIJDEPTO-RPIVPN/x.x.x.x:49881 MULTI: primary virtual IP for NAFIUX-MX-TIJDEPTO-RPIVPN/x.x.x.x:49881: 172.16.0.6
NAFIUX-MX-TIJDEPTO-RPIVPN/x.x.x.x:49881 MULTI: internal route 172.16.4.0/23 -> NAFIUX-MX-TIJDEPTO-RPIVPN/x.x.x.x:49881
NAFIUX-MX-TIJDEPTO-RPIVPN/x.x.x.x:49881 MULTI: Learn: 172.16.4.0/23 -> NAFIUX-MX-TIJDEPTO-RPIVPN/x.x.x.x:49881
NAFIUX-MX-TIJDEPTO-RPIVPN/x.x.x.x:49881 REMOVE PUSH ROUTE: 'route 172.16.4.0 255.255.254.0'
As you can see in the last line, OpenVPN Server learn (from the iroute associated to the file of the OpenVPN client in the ccd folder) about the route and remove the push command to the client.
Start the OpenVPN server:
sudo openvpn --config NAFIUX-AWSUSEAST-NCPDEV-GATEWAY.conf --askpass NAFIUX-AWSUSEAST-NCPDEV-GATEWAY.pwd
Trick: I created another file named NAFIUX-AWSUSEAST-NCPDEV-GATEWAY.pwd which contain the password of the private key, to avoid enter it every time.
OpenVPN Server is now ready to allow OpenVPN clients to connect and route the packages properly.
OpenVPN Client (Raspberry Pi)
I used a Raspberry Pi Model B (512 MB ram, SD card) with Raspbian (2017-06-21-raspbian-jessie-lite.zip), there is a lot of documentation about how to prepare your SD card to use your Raspberry Pi, the only trick which I had troubles with was: enable the SSH server, to do so, you just need to create an empty file in /boot/ssh, that is like a flag that Raspberry Pi uses to enable the server.
(If you’re new with Raspberry Pi, I strongly suggest to connect your Raspberry Pi to a video device to see what is going on, even the IP address is shown there, there are other ways to detect the IP, I decided to check the log of my ISP router to detect it).
With the SSH server enabled, you can login and start manipulating the Raspberry Pi (default username and password, pi and raspberry, respectively), i.e., ssh pi@raspberryipaddress
Now is time of configure the Raspberry Pi.
Assign a static IP address
Edit the file /etc/network/interfaces as follow:
# interfaces(5) file used by ifup(8) and ifdown(8)

# Please note that this file is written to be used with dhcpcd
# For static IP, consult /etc/dhcpcd.conf and 'man dhcpcd.conf'

# Include files from /etc/network/interfaces.d:
source-directory /etc/network/interfaces.d

auto lo
iface lo inet loopback

# I have connected my Raspberry Pi to my ISP router on this interface
auto eth0
iface eth0 inet static
    # This is the new IP address of the Raspberry Pi, that also will be the new default gateway (see below the DHCP server configuration)
    address 192.168.1.1
    netmask 255.255.255.0
    # This is the IP address of my ISP router, which is the default gateway of the Raspberry Pi
    gateway 192.168.1.254
    dns-nameservers 8.8.8.8 8.8.4.4
    # Load automatically the IPTABLES rules (defined below in the ipv4 and masquerading section)
    post-up iptables-restore < /etc/iptables/rules.v4

# I have enabled another virtual interface with an IP address from my second subnet
auto eth0:0
iface eth0:0 inet static
    address 172.16.4.1
    netmask 255.255.254.0

allow-hotplug wlan0
iface wlan0 inet manual
    wpa-conf /etc/wpa_supplicant/wpa_supplicant.conf

allow-hotplug wlan1
iface wlan1 inet manual
    wpa-conf /etc/wpa_supplicant/wpa_supplicant.conf
Finally, disable the DHCPCD (Client Service) service and reboot the Raspberry Pi (don’t forget to use the new ip):
sudo update-rc.d dhcpcd disable
sudo reboot
DHCP Server
Install with sudo apt-get install isc-dhcp-server and edit /etc/dhcp/dhcpd.conf as follows:
# The ddns-updates-style parameter controls whether or not the server will
# attempt to do a DNS update when a lease is confirmed. We default to the
# behavior of the version 2 packages ('none', since DHCP v2 didn't
# have support for DDNS.)
ddns-update-style none;

# option definitions common to all supported networks...
option domain-name "tijdepto.mx.nafiux.com";
option domain-name-servers 8.8.8.8, 8.8.4.4;

default-lease-time 600;
max-lease-time 7200;

# If this DHCP server is the official DHCP server for the local
# network, the authoritative directive should be uncommented.
authoritative;

# Use this to send dhcp log messages to a different log file (you also
# have to hack syslog.conf to complete the redirection).
log-facility local7;

# No service will be given on this subnet, but declaring it helps the
# DHCP server to understand the network topology.

subnet 172.16.4.0 netmask 255.255.254.0 {
}

# This is the subnet that I will use to assign IP to the devices that are connected to my wireless AP.
subnet 192.168.1.0 netmask 255.255.255.0 {
  range 192.168.1.100 192.168.1.200;
  # This is the new IP address of the Raspberry Pi
  option routers 192.168.1.1;
  option broadcast-address 192.168.1.255;
}
Configure the DHCP defaults in /etc/default/isc-dhcp-server as follow:
# Path to dhcpd's config file (default: /etc/dhcp/dhcpd.conf).
DHCPD_CONF=/etc/dhcp/dhcpd.conf

# Path to dhcpd's PID file (default: /var/run/dhcpd.pid).
DHCPD_PID=/var/run/dhcpd.pid

# On what interfaces should the DHCP server (dhcpd) serve DHCP requests?
#       Separate multiple interfaces with spaces, e.g. "eth0 eth1".
INTERFACES="eth0"
Now, disable the DHCP Server of your ISP router and enable the DHCP Server of the Raspberry Pi:
sudo service isc-dhcp-server restart
IPv4 forwarding and masquerading to network interfaces
To enable the IPv4 forwarding edit the file /etc/sysctl.conf, and ensure that the following line is uncommented and with the value = 1:
net.ipv4.ip_forward=1
Enable masquerading to eth0 and tun0 to allow the traffic of other devices in your network to pass thru those network interfaces in the Raspberry Pi, execute as sudo, i.e, sudo su:
# Flush the entire iptables
iptables -F
iptables -X
iptables -t nat -F
iptables -t nat -X
iptables -t mangle -F
iptables -t mangle -X
iptables -P INPUT ACCEPT
iptables -P FORWARD ACCEPT
iptables -P OUTPUT ACCEPT

# Allow established connections
iptables -A INPUT -m state --state ESTABLISHED,RELATED -j ACCEPT
iptables -A FORWARD -m state --state ESTABLISHED,RELATED -j ACCEPT

# Masquerade the traffic
iptables -t nat -A POSTROUTING -o eth0 -j MASQUERADE
iptables -t nat -A POSTROUTING -o tun0 -j MASQUERADE
Save the current iptables configuration (if /etc/iptables folder doesn’t exists, create it with mkdir /etc/iptables):
iptables-save > /etc/iptables/rules.v4
This file /etc/iptables/rules.v4 was used above in the /etc/network/interfaces configuration file to load the iptables rules automatically.
OpenVPN Client configuration
Install OpenVPN in Raspberry Pi is straight forward, just execute the command sudo apt-get install openvpn.
As I mentioned above, I opted for the PKI, so, before to start, you must create the private key and certificate for the Raspberry Pi using the same CA (Certification Authority), once you have them, you can continue with the OpenVPN Client configuration, here an example of a client config file:
client

# "dev tun" will create a routed IP tunnel
dev tun

# OpenVPN listen protocol
proto udp

# The hostname/IP and port of the server. You can have multiple remote entries
# to load balance between the servers.
remote y.y.y.y 1194 # This is the Elastic IP address of the EC2 instance in the public zone

# Keep trying indefinitely to resolve the host name of the OpenVPN server. Very useful
# on machines which are not permanently connected to the internet such as laptops.
resolv-retry infinite

# Most clients don't need to bind to a specific local port number.
nobind

# Try to preserve some state across restarts.
persist-key
persist-tun

# SSL/TLS root certificate (ca), certificate (cert), and private key (key).
# The server and all clients will use the same ca file.
ca ca.crt
cert NAFIUX-MX-TIJDEPTO-RPIVPN.crt
key NAFIUX-MX-TIJDEPTO-RPIVPN.key

# Verify server certificate by checking that the certicate has the correct key usage set.
remote-cert-tls server

# Enable compression on the VPN link. If you enable it here, you must also enable it in the client config file.
comp-lzo

# Set the appropriate level of log
# file verbosity.
#
# 0 is silent, except for fatal errors
# 4 is reasonable for general usage
# 5 and 6 can help to debug connection problems
# 9 is extremely verbose
verb 3
The configuration file is self explanatory.
Execute the client with:
sudo openvpn --config NAFIUX-MX-TIJDEPTO-RPIVPN.conf --askpass NAFIUX-MX-TIJDEPTO-RPIVPN.pwd
Notice that I also created the NAFIUX-MX-TIJDEPTO-RPIVPN.pwd file which contains the password of the private key.
Now is time of test!
I have created an EC2 instance in a private subnet, as you can see in the image above, it doesn’t have a public IP address:

Trying with ping (using my laptop which has assigned an IP from the Raspberry Pi DHCP Server):

I was able to reach the EC2, the ttl=253 indicates that it tooks 2 hops to reach the EC2 from my laptop, i.e., the Raspberry Pi (OpenVPN Client) and the NAT Instance (OpenVPN Server).
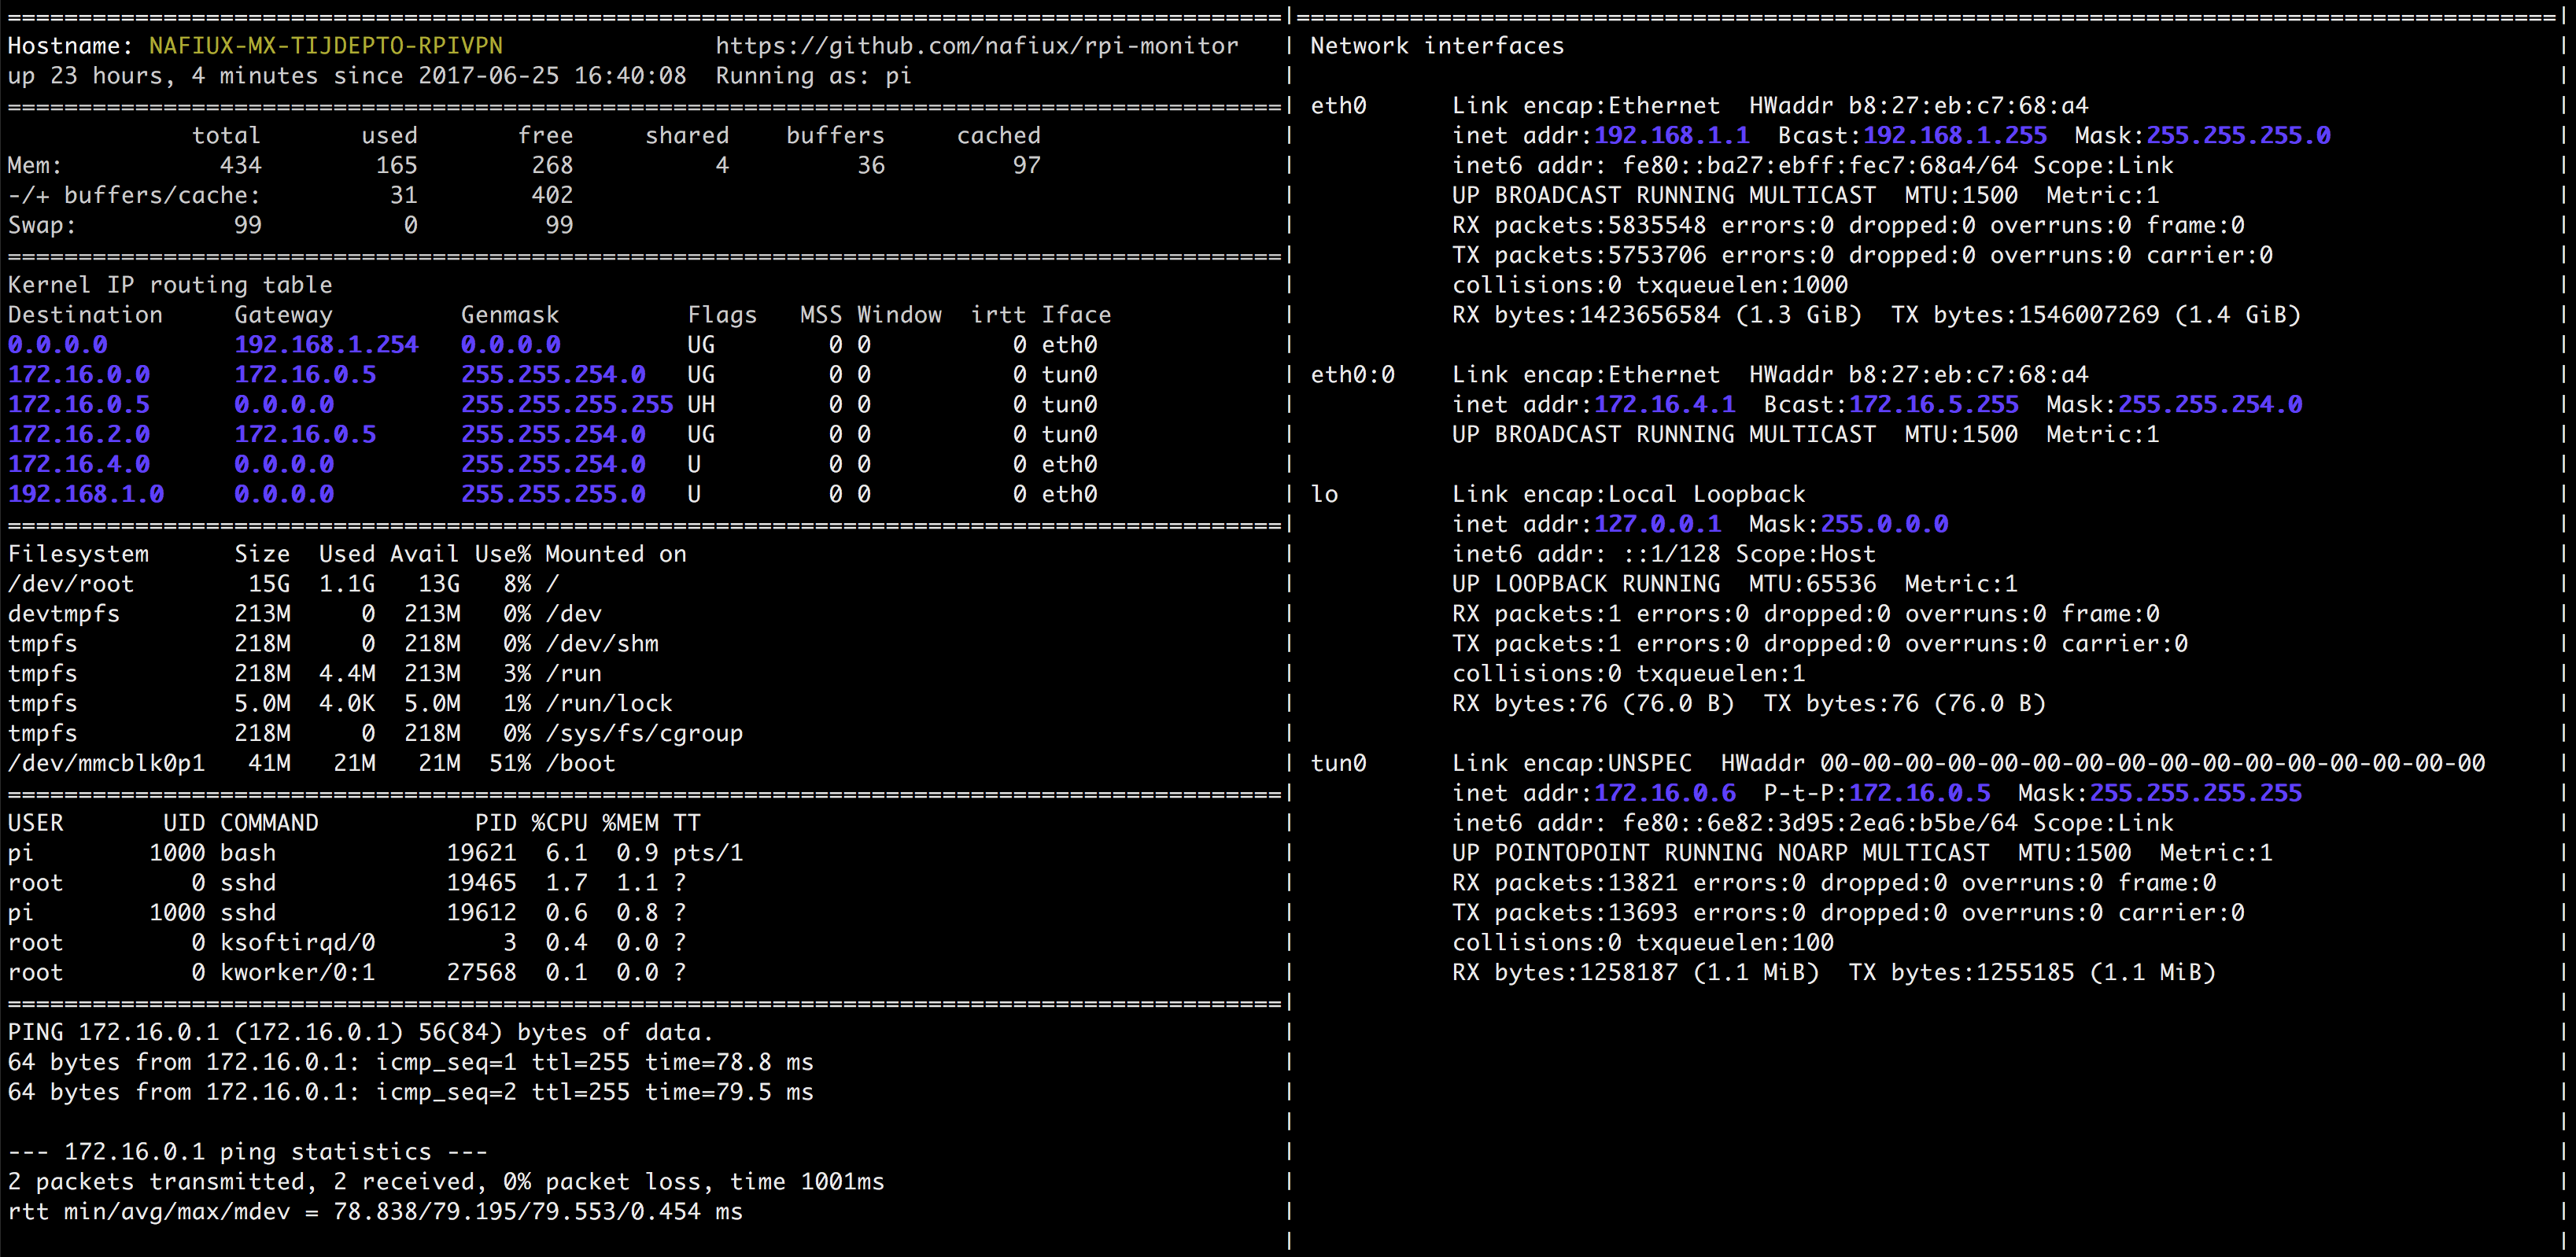
Dashboard
Finally I built a simple dashboard to monitor the memory, kernel router table, cpu, connectivity to the OpenVPN Server and network interfaces, and, to take advantage of the HDMI port, I’m showing the monitor script every 10 seconds on tty1 (ensure to give access to other users to the tty1 device with sudo chmod 666 /dev/tty1).
#!/bin/bash
while true
do
 ./collect.sh > output.txt
 cat output.txt > /dev/tty1
 sleep 10
done
Project available on https://github.com/nafiux/rpi-monitor